Editor: Managing Scripts
Editor: Managing Scripts
The script management panel organizes and provides quick access to the scripts and sections necessary for creating complex behaviors. The script management panel is divided into three parts:
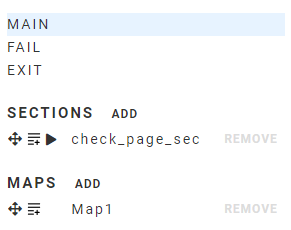
Top-level sections, the three scripts that serve as the main entry points for execution with Alyvix Robot (MAIN, FAIL, and EXIT)
User-defined Sections , which are subroutines that can be used inside other top-level and user-defined sections
Maps , which are user-defined tables of keys and values that can be used to (a) take a text string scraped from the screen and map it to another string, or (b) loop over a test case object (using the FOR expression) for as many rows as there are in the map’s table
From the script management panel you can:
Click on the name of a script or map to show its contents in the scripting panel
Add a new Section or Map element (see below) with the action
Delete an existing section or map element with the action
Use the icon to drag a section or map element and drop it at any desired point in the currently opened script in the scripting panel
Use the
 action to add a Section (as a RUN expression) or a Map (as a FOR
expression) to the bottom of the currently opened script in the scripting panel
action to add a Section (as a RUN expression) or a Map (as a FOR
expression) to the bottom of the currently opened script in the scripting panelUse the action to immediately debug a Section script against the current interface as though you had pressed the
 button
Top level Scripts
The following scripts are predefined and are executed by Alyvix Robot:
Main: The principal script that is invoked when launching a test case from either Alyvix Editor (via the
button) or RobotFail: A script that is executed if one of the test case objects in the Main script having the Break flag set exceeds its timeout
Exit: A separate script that is always run once the Main or Fail script terminates, allowing you to restore your application and environment to its prior state (for instance, to shut down a browser that was launched as part of a test case)
These three names are reserved – you cannot use them as names for your own sections or maps.
When Alyvix Robot starts, it first executes the Main section. Each scripting node in the Main section or one of its subsections is then matched in turn against the current screen. If the timeout is exceeded for one of those test case objects whose break flag is set, then Alyvix will stop running the Main section and begin running the Fail section.
The Fail section should then perform any actions needed to clean up the partially completed application state, such as closing windows that might be left open. Once the Main (or Fail) section has completed, your Exit section should log out if necessary and hard kill any opened applications that were used during the test case.
Note
When you construct both your Fail and Exit sections, you should unset the break flag in all of their test case objects to ensure that every one of them executes. Since they will run consecutively and without triggering another break, they shouldn’t contain any of the same steps.
Note
Transactions in the Fail and Exit sections will not report measures, even if the transaction’s Measure flag is set.
The goal when constructing Fail and Exit sections is that every time Alyvix Robot runs a test case, the operating system and application state should be just as clean as the first time it was executed.
Sections
Sections are subscripts (subroutines) that can be called one or more times by name from other scripts or subscripts. This can greatly help improve the readability of scripts, especially when they become very long.
When you insert or replace a test case object with a section in the scripting panel, the color will become dark green to indicate it is a section. A link icon will appear, and clicking on it will load that section in the scripting panel.
Note
You cannot use a section as the antecedent (condition) in an IF TRUE or IF FALSE expression, although you can use it as the consequent, or as the argument of a FOR expression.
Tip
You may find it useful to explicitly mark sections and maps using their names, to avoid
potentially confusing them with test case object names, e.g.: logout_section or
download_map.
The Map Interface
The Maps feature lets you create a table of strings that you can use to (a) map a string scraped from an application (the key) to extract another string (the value), or (b) loop over a test case object or a section, once for each row (top to bottom) in the map.
Note
Rows in a map are automatically sorted alphabetically by the key, so if order is important, it should be reflected in how the keys are named.
You can add a new map by clicking on the button next to MAPS in the script management panel. You should then change the name of the map from the default to something that helps you easily remember what it’s used for.
The first step after creating a map is to define the set of keys and values that can be inserted. (When used as part of a FOR loop, the number of iterations is fixed, and will always be equal to the number of keys in the map.) The map interface is shown here, with the available actions listed below:

— Add a new row to the bottom of the table
— Add a new column to the right of the table
— Delete a row or the rightmost column
When a test case containing a map is executed, measurements are collected for each iteration of the map. These measurements are output when execution in CLI mode has completed.
Debugging Scripts
When composing scripts, you often need to check that one or more of the test case objects you’ve just created work correctly before proceeding to build the following one. As your scripts get longer or more complex, regularly testing objects becomes more important. Without it you risk losing significant time when you have to modify later objects in the script because an intermediate one was built incorrectly.
There are two main problems to overcome when debugging scripts:
Executing the main script either via the
button in Editor
or via Alyvix Robot will launch the script from the very first
node, although what you often need during debugging is to start at an intermediate stageWhen starting at an intermediate stage, the application or browser’s interface must match the expectations of the (first) test case object being debugged
There are several methods you can use to debug both individual nodes and parts of scripts, as opposed to the entire script:
Use the Disable/Enable functionality to temporarily turn off nodes in the scripting panel that don’t need to be tested, and then press the
button. Note that when done, you
must remember to re-enable the scripting nodes.Use the action in Selector to run either a single test case object or to run a single section. (Note that running a section this way will run every enabled scripting node in that section.)
Select one or more scripting nodes with the mouse and then use the button to run just those nodes. Unlike disabling, you do not need to remember to re-enable them later.
When using both the disable/enable and run selection strategies, you can select the starting point of the script to match the current state of the application or browser’s interface.