Example: Launch a Web Browser and Monitor a Web Page
Example: Launch a Web Browser and Monitor a Web Page
Our previous examples used the Windows Start button. These are easy as first steps because the Start button is available on every Windows desktop, but they’re also more like toy examples than actual productive use cases.
More often you’ll want to launch an application that’s not necessarily available from the Desktop, such as a Microsoft Office app, a calendar, or a web app like SalesForce or Dynamics 365. So let’s look at an example where we start up a browser and check how long it takes to load the first page.
Before we start, there’s an important point about web browsers that we need to take into consideration: browsers have GUI persistence, meaning that they remember the size and position onscreen of the last browser window that the user had open. Assuming that we want to check frequently that a web app is up and running (i.e., monitor), or run a preset script (i.e., a macro behavior), it makes things much easier if we know exactly where and what size the browser window will be when we launch it.
In addition, it’s also a big help if we know whether the browser window is already open and visible on the screen, because we don’t want to launch it if it’s already launched. Third, browsers will remember your credentials and immediately log in without asking you, so if for instance you want to test whether or not the login window is working, you don’t want that browser behavior to occur.
So in many cases you should consider the following best practices for web apps when using Alyvix, which will make it easier to write robust Alyvix test cases:
Launch the browser in full screen mode so you know where the window boundaries and controls will be
Close the browser as the last step in your script, so that it won’t still be open the next time you run the test case
Launch the browser in private mode so it doesn’t look for existing credentials
Let’s see how we can do all of this in one simple Alyvix test case:
Make sure the Desktop is empty, with no open windows. Then launch Alyvix Editor with a new file name not already in our test case directory:
C:\Alyvix\testcases> alyvix_editor -f browser-testTo give us time arrange the desktop the way we want it before capturing the screen, we can set the screen capture delay by changing the number in at the bottom of Alyvix Editor from
0seconds to something higher like5: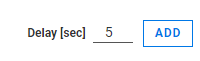
Now click on and then immediately press Escape to return to Alyvix Editor.
We now have this step at the top right of Alyvix Editor containing only the root node component:
Rather than directly clicking on an icon to launch our desired browser, we’ll use this step to launch it directly and pass it a few startup parameters so that we can follow the best practices we described above. At the bottom right of Alyvix Editor you’ll see this:
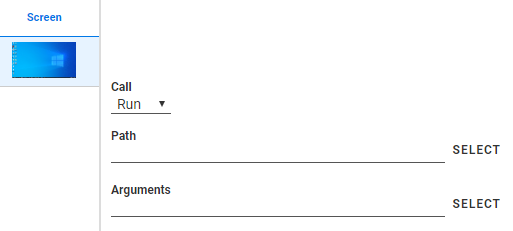
Leave the “Call” field set to Run, but fill in the “Path” field either by copying and pasting the application path (in our case for the executable of the web browser we want to use), or by using SELECT to bring up the file chooser.
Next, we can fill in the browser parameters. These generally have the form of Linux command line switches, where there are one or more options each beginning with a double dash (
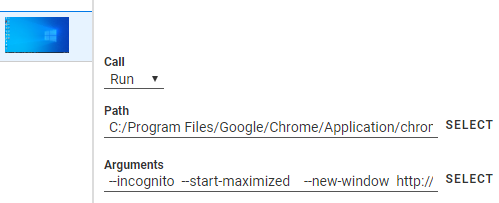
--), followed finally by the URL we want the browser to load.For instance if we want to start at
http://www.visittrentino.itand follow our best practices, we would type this in the “Arguments” field (assuming a Chromium-based browser like Chrome):--incognito --start-maximized --new-window http://www.visittrentino.itWhen you’re done it should look like this:
We don’t even need to launch the browser ourself, Alyvix will do it for us. At the bottom left you’ll see that the new step was added with the default name
VisualObject1. Change the name to something likeLaunch Browserand then click on the black “Play” icon just to its left.
If everything went correctly you should see that a full screen, new private window was launched and that the website was automatically loaded. A cookie notice will pop up because you’re in incognito/privacy mode, and if you exit and run this step again, the cookie notice will pop up again now matter how many times you press “Allow all”, because it doesn’t recognize you as the same user. Similarly, if you go to a login page, it will always ask for your credentials and never load them from the browser cache.
Note that Edge (also Chromium-based) and Firefox have similar command line options to the Chrome options we used here.
You can now add any number of additional steps to continue the desired interaction with the browser, such as actually logging in, running through the steps of a particular task, and logging out.
In step #4 we launched a browser, but that step didn’t actually measure anything. Suppose though that we want to see how long it took to load the page, and then follow our best practices and exit the application.
To do that, click on at the bottom of Alyvix Editor again to capture the screen showing our maximized browser, then mark up these two screen elements that will indicate the page successfully loaded:
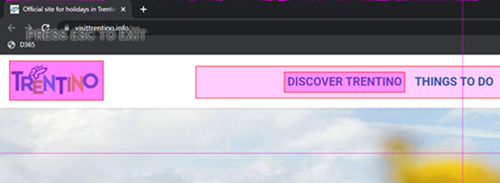
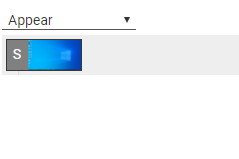
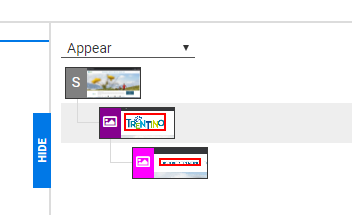
Now press Escape to return to Alyvix Editor. At the top right you’ll see several boxes representing the selected screen elements underneath the keyword “Appear”, which means you want to know the moment that those elements appeared onscreen:
Click on the top box marked “S”, and you’ll see the same options at the bottom that we saw after the first step. This time under “Call” select the Kill option. If you then click on the “Process” box, a list of currently running process will appear:
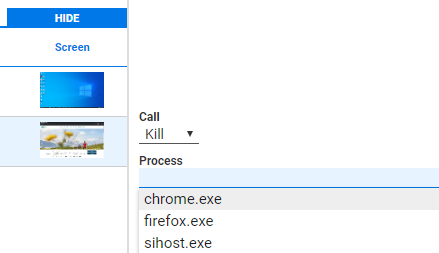
Simply select the browser you’re running, and when this step matches against the interface, Alyvix will record the time taken and then kill the browser process (our other best practice we mentioned at the beginning of this tutorial). You can then run this test case a second or third time and you won’t end up with a ton of browser windows cluttering your desktop.
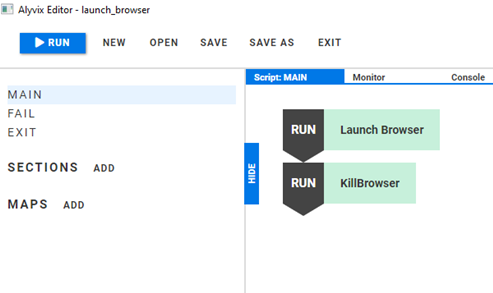
You can now add the two steps to the Script panel by dragging them or by pressing the add step action next to the black “Play” icon:
Let’s check our test case works by calling Alyvix Robot using the
 button at the top left.
When the test case runs you’ll see the browser launch, the web page load, and then the browser will
disappear. Alyvix Editor will then appear again with the Console panel displaying the timing data
for our steps:
button at the top left.
When the test case runs you’ll see the browser launch, the web page load, and then the browser will
disappear. Alyvix Editor will then appear again with the Console panel displaying the timing data
for our steps: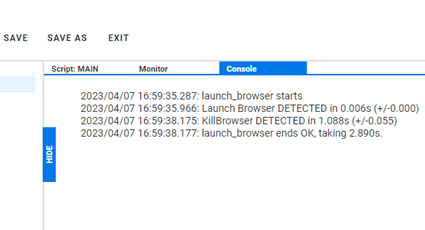
Congratulations on making it through this tutorial! You can now optionally save your test case and exit Alyvix Editor using the and buttons at the top.
You can watch a video version of this tutorial example on YouTube .